Watrex P102 – High-Precision HPLC Pump with Simple Maintenance
- Photo: Watrex Praha: Watrex P102 HPLC pump
- Video: Watrex Praha: P102 replace seal
The Watrex P102 is a dual-piston HPLC pump designed for precise analytical applications in liquid chromatography. It stands out for its stable flow rate, minimal pulsation, and the option for active piston flushing. Thanks to its modular design and user-friendly interface, it is suitable not only for routine analyses but also for development and research applications.
One of the key advantages of the P102 pump is its easy maintenance. Watrex offers the so-called P102 Seal Kit, which allows quick and safe seal replacement directly by the user. This article provides an overview of the pump’s features along with a detailed guide for seal replacement, including recommendations for commissioning.
Seal Kit Variants
To replace the seals of the P102 pump, you need to purchase the appropriate seal kit:
- P102 Seal Kit D2K5042982 (organic) – for organic mobile phases
- P102 Seal Kit D2K5042983 (aqueous) – for aqueous mobile phases
Both kits include all components required for the replacement.
Seal Replacement Procedure for the P102 Pump
1. Disconnect the Outlet Capillaries
Start by unscrewing the outlet capillaries from the pump head. This is essential to prevent damage to internal components during disassembly.
2. Loosen the Pump Head
Once the capillaries are removed, unscrew the knurled nuts that secure the pump head to the mechanical part of the pump. It is important to disconnect the capillaries first—doing this in reverse may damage the piston.
3. Remove the Flush Capillaries
Disconnect the capillaries used for active piston flushing. Once they are detached, the pump head can be carefully removed.
4. Disassemble the Flush System
Underneath the pump head is the active flush assembly, which should also be removed.
5. Loosen the Backup Seal Plate
Use the special tool from the Seal Kit to remove the backup plate that holds the high-pressure seal in place.
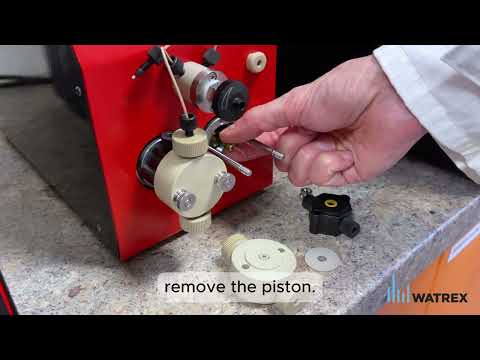
6. Remove the Piston
The piston can now be carefully extracted. Handle the piston with maximum care—its surface must remain intact.
7. Remove Worn Seals
Use the other end of the Seal Kit tool to remove the old high-pressure seal from the pump head. Do the same for the flush seal.
8. Polish the Piston
The Seal Kit includes a sponge for gently polishing the piston surface. This helps remove microscopic deposits and prolongs the life of the new seals.
9. Install New Seals
Select the new seals from the kit. Press each seal firmly into place using the installation tool provided in the kit.
10. Reassemble the Pump
After replacing all seals, reassemble the pump in the reverse order of disassembly:
- Reinstall the flush system (inlet at the bottom, outlet at the top)
- Attach the pump head
- Reconnect the capillaries
- Securely tighten the knurled mounting nuts
Don’t Forget Conditioning!
After replacing the seals, it’s essential to condition them to ensure they seat properly and adhere correctly to the piston walls. For the P102 model, follow these steps:
- Prepare a mobile phase consisting of 50% isopropanol or methanol and water.
- Run the pump against back pressure to achieve 3.5–4 MPa.
- Let the pump run at a flow rate below 3 ml/min for 60 minutes.
These conditions apply specifically to the P102 model. For preparative and semipreparative pumps from Watrex, refer to the instructions specific to each type.
Summary
The Watrex P102 is a high-quality laboratory tool that allows users to perform maintenance themselves, thanks to the available Seal Kits and straightforward construction. Regular seal replacement is key to the long life and reliability of the device. By following this guide, the replacement process can be completed quickly and safely without needing a service technician.
If you have any questions or need assistance, feel free to contact us at
[email protected] or visit our website at www.watrex.com.


