Pipetting Made Easy – Part 1: Best Practice Guide
KNAUER: Pipetting Made Easy – Part 1: Best Practice Guide
Pipetting Like a Pro – Best Practice Guide to Proper Pipetting
Correct Pipetting Starts with Good Technique
Proper pipetting is one of the fundamental laboratory skills and plays a crucial role in ensuring reliable and reproducible experimental results. Even minor deviations in transferred volume can lead to significant differences in analytical data, unnecessary reagent consumption, and inaccurate conclusions. This becomes particularly important in high-precision analytical techniques such as HPLC, where both accuracy and reproducibility are essential. This guide summarizes practical recommendations and useful techniques to help you pipette with greater confidence and consistency.
The Pipetting Workflow
Every complete pipetting procedure consists of four essential steps:
- Volume adjustment and tip attachment
- Liquid aspiration
- Liquid dispensing
- Tip ejection
Performing each of these steps correctly is essential for minimizing variability and achieving high-quality analytical results.
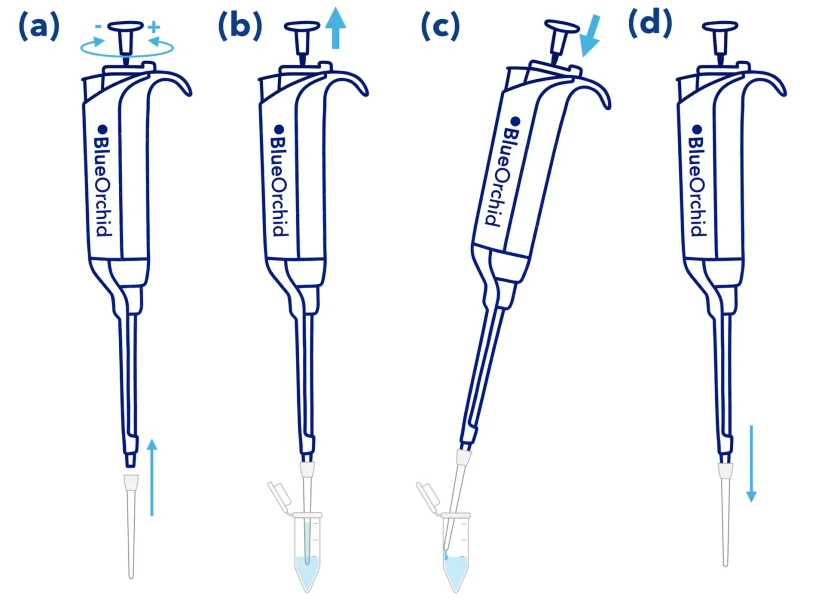 KNAUER: Figure 1 - The Pipetting Cycle
How to Pipette Properly
Maintain the Correct Immersion Angle
The Right Immersion Angle for Success
When aspirating liquid, hold the pipette at an angle of no more than 20° from the vertical. Keeping this angle constant throughout the entire pipetting process is equally important. Variations in the aspiration angle can influence the hydrostatic pressure within the pipette tip, potentially causing inconsistent aspiration volumes.
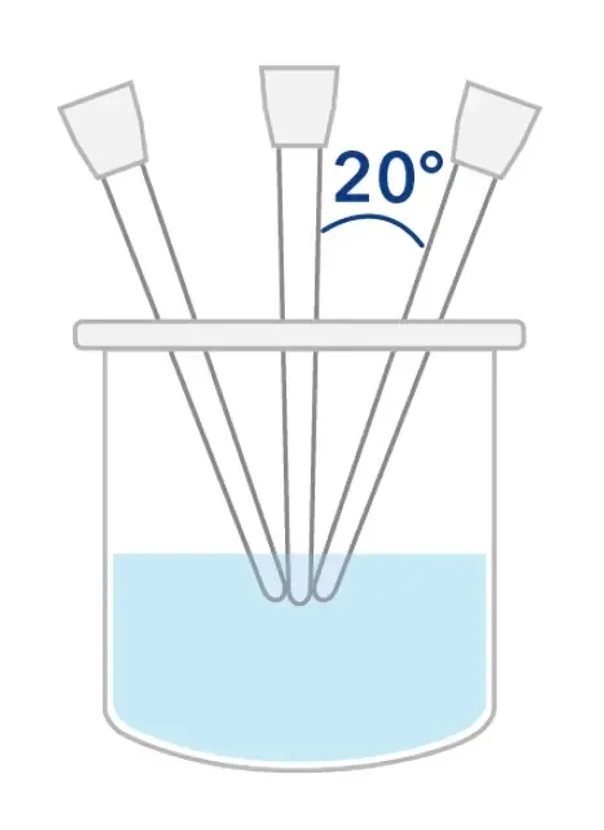 KNAUER: The Right Immersion Angle for Success
Control the Immersion Depth
Always immerse the pipette tip to the recommended depth according to the selected pipette volume (see Table 1). If the tip is submerged too deeply, excess liquid may be aspirated because droplets can adhere to the outer surface of the tip. Conversely, insufficient immersion may introduce air bubbles into the sample, resulting in reduced delivered volume. The pipette tip should also never touch the bottom of the container, as this may interfere with proper liquid aspiration.
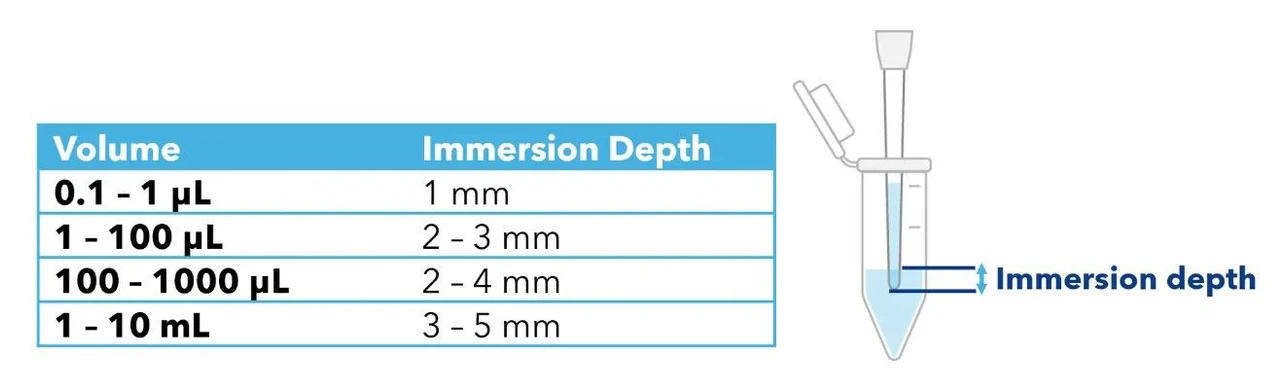 KNAUER: Table 1 - Recommended immersion depths based on the pipette volume.
Rhythm and Speed – Smooth Movements Matter
Consistent Technique Improves Reproducibility
Maintaining the same aspiration and dispensing speed, together with consistent plunger pressure, is essential for obtaining reproducible results. Fast or jerky movements can cause splashing, aerosol formation, air bubble introduction, shaft contamination, or even sample loss.
The key is to use smooth, controlled movements throughout the entire pipetting cycle. Press and release the plunger steadily while maintaining a constant speed. After aspirating the liquid, wait approximately one second before withdrawing the tip from the sample. This brief pause allows the liquid to completely enter the tip and improves aspiration accuracy.
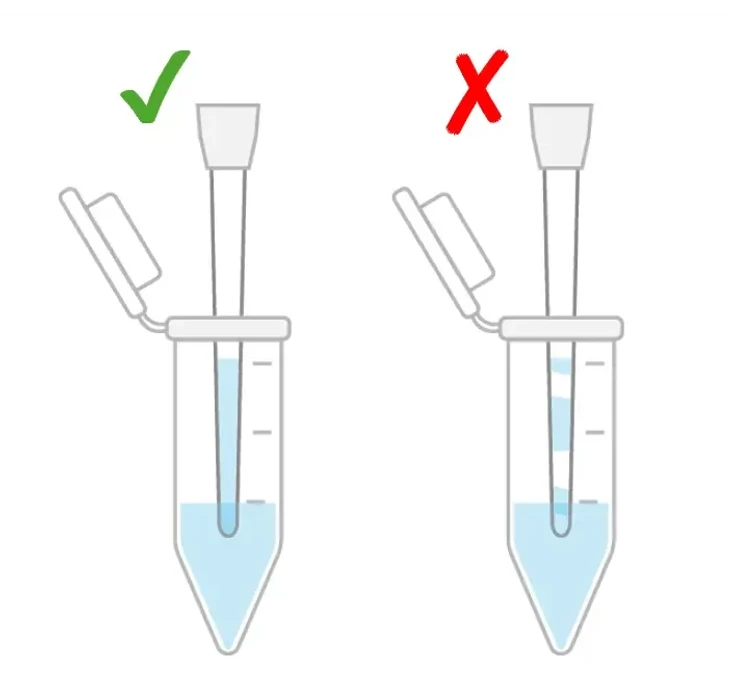 KNAUER: Rhythm and Speed- Smooth Movements are Essential
Dispense with Precision
For optimal dispensing accuracy, gently touch the pipette tip against the inner wall of the receiving vessel and slowly slide it upward along the surface (Figure 2 (a)). This technique helps prevent droplets from remaining on the tip and ensures that the entire sample is transferred. When withdrawing the tip from the vessel, continue holding the plunger fully depressed to avoid accidentally aspirating liquid back into the tip.
For aqueous, low-viscosity samples, two additional dispensing techniques are equally effective.
The first is dispensing directly into the liquid without touching the vessel wall (Figure 2 (b)). This wet-dispense technique is particularly suitable for transferring small sample volumes, as it minimizes sample loss caused by droplets adhering to the vessel walls.
The second option is surface dispensing (Figure 2 (c)). Here, the droplet is gently brought into contact with the liquid surface while the pipette tip is slowly withdrawn. This approach is especially recommended for dispensing volumes below 1 µL, as the liquid already present in the vessel helps detach the tiny droplet from the pipette tip, improving volume accuracy.
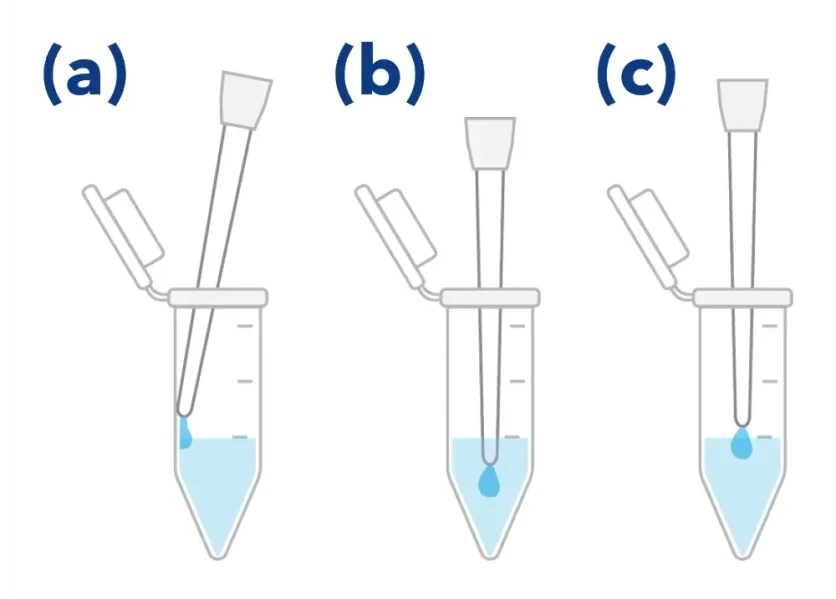 KNAUER: Figure 2 - Techniques for dispensing a sample. (a) Side wall touch off – the standard method, (b) into liquid dispense, and (c) surface touch off
How to Optimize Pipetting Performance
Select the Appropriate Volume Range
Choose the Right Pipette for the Volume
Air displacement pipettes deliver the highest accuracy when operated between 35% and 100% of their nominal volume. Whenever possible, avoid pipetting below 10% of the pipette's maximum capacity, as measurement errors increase significantly in this range.
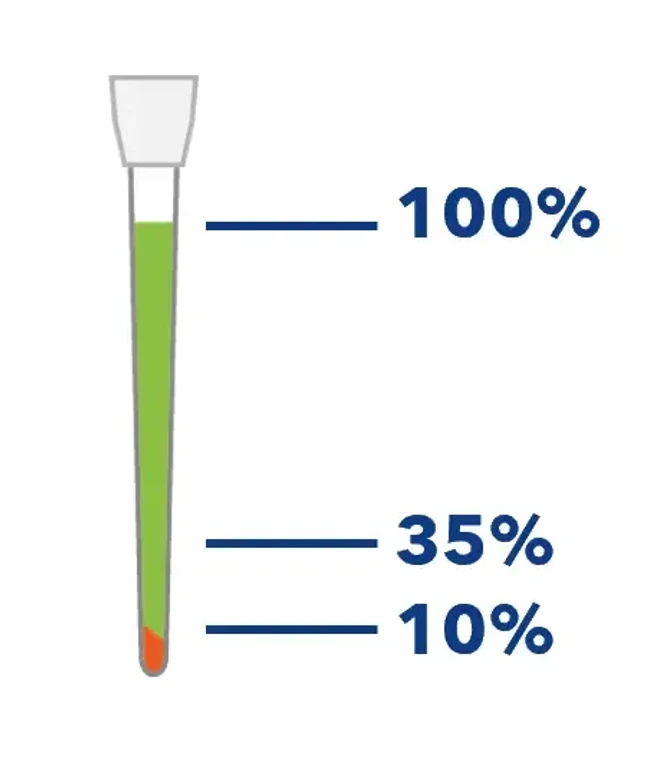 KNAUER: Choose the Correct Volume Range
Using a pipette within its recommended operating range not only improves accuracy and precision but also reduces technique-dependent variability, making consistent results easier to achieve.
For example, if your application requires dispensing 10 µL, a pipette covering 0.5–10 µL is a much better choice than one with a 10–100 µL range. The smaller pipette provides noticeably lower accuracy and precision errors, resulting in more reliable measurements (see Table 2).
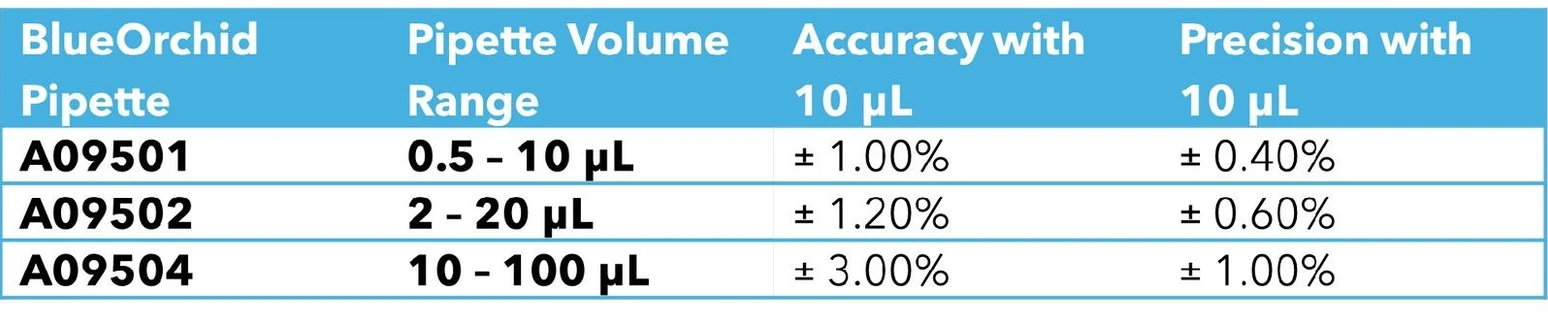 KNAUER: Table 2 - Recommended immersion depths based on the pipette volume.
Pre-Wet the Tip
Before transferring your sample, aspirate and dispense the liquid three times using the nominal volume. This simple preparation step helps equalize temperature differences and humidifies the air cushion inside both the pipette and the tip, leading to improved dispensing accuracy.
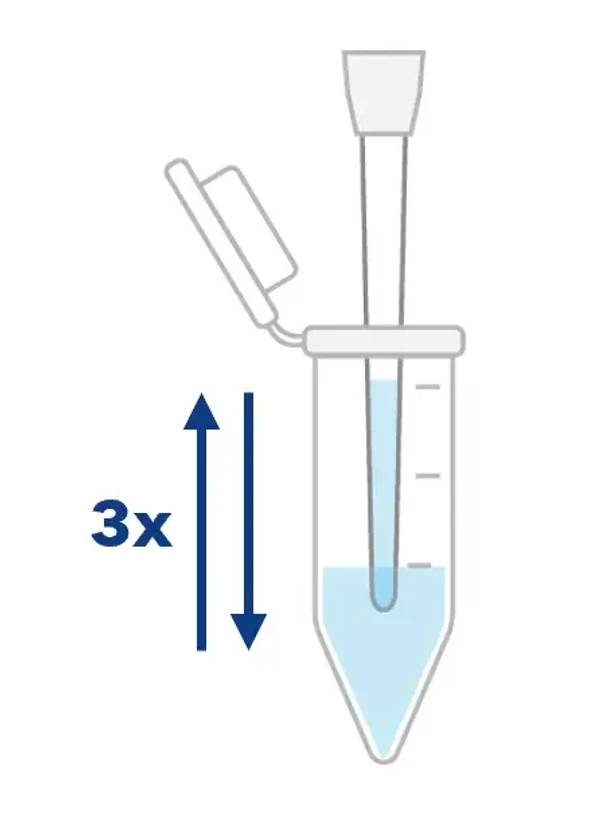 KNAUER: Pre-Wet the Tip
If pre-wetting is omitted, the first few dispensing cycles may deliver slightly smaller volumes due to evaporation inside the tip.
💡 Pro Tip: Pre-wetting is particularly recommended for pipettes with volumes above 10 µL and is especially beneficial when handling volatile liquids such as organic solvents.
How to Handle Viscous or Volatile Liquids Correctly
Highly viscous liquids require slower aspiration and dispensing speeds. In addition, reverse pipetting is recommended because the narrow pipette tip opening and the compressibility of the air cushion make it difficult to aspirate and dispense viscous samples quickly and completely. Such liquids also tend to remain on the inner walls of the tip, making complete delivery more challenging. Reverse pipetting compensates for these effects by aspirating the selected volume together with an additional reserve volume.
When working with volatile samples, begin by pre-wetting the pipette tip to saturate the internal air space with vapor. Then perform the transfer using reverse pipetting while working efficiently to minimize evaporation. Because reverse pipetting aspirates a slightly larger volume, evaporation has less influence on the volume ultimately delivered.
💡 Pro Tip: Reverse pipetting is the preferred technique for both viscous and volatile liquids.
Standard versus Reverse Pipetting
Standard (Forward) Pipetting (Figure 3 (a))
Forward pipetting is the standard technique used in most laboratories and is best suited for aqueous, non-viscous liquids. The procedure consists of the following steps:
- Press the plunger down to the first stop.
- Slowly release the plunger, allowing the piston to rise and aspirate the sample into the tip.
- Dispense the liquid by pressing the plunger smoothly to the first stop.
- Pause briefly (approximately one second), then continue pressing to the second stop to expel any remaining liquid from the tip.
- Release the plunger back to its resting position.
- Replace the pipette tip before continuing with the next sample.
Using this method ensures accurate and complete sample transfer for most routine laboratory applications.
Reverse Pipetting (Figure 3 (b))
Reverse pipetting is recommended for viscous, foaming, or volatile liquids, where standard pipetting may result in reduced accuracy. The technique follows a slightly different procedure:
- Press the plunger all the way down to the second stop.
- Slowly release the plunger to aspirate the sample into the tip.
- Dispense the sample by pressing the plunger only to the first stop.
- Keep the plunger at the first stop after dispensing. A small amount of liquid will intentionally remain inside the tip and should not be transferred.
- Discard the remaining liquid together with the tip or return it to the original reagent container by pressing the plunger to the second stop.
This additional reserve volume compensates for liquid that would otherwise remain inside the tip, resulting in improved accuracy when handling difficult samples.
Note: Ensure that the additional aspirated volume does not reach the pipette shaft or the tip filter.
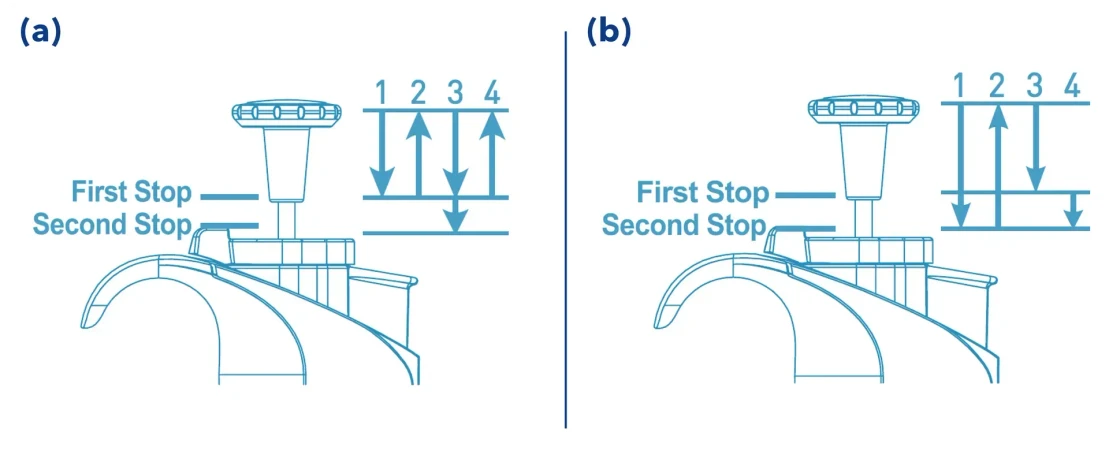 KNAUER: Figure 3 - Pipetting techniques. (a) Standard or forward pipetting and (b) reverse pipetting.
Density Matters – Recalibration Based on Liquid Density
Pipettes are factory calibrated using water at room temperature. When transferring liquids with densities that differ significantly from water, volumetric accuracy may be affected.
Whenever you routinely work with liquids of substantially different density, recalibrate the pipette accordingly. Most modern pipettes allow individual calibration adjustments using the supplied calibration tool, making it possible to optimize performance for specific liquid types.
Without proper recalibration, measurements may appear precise while actually delivering incorrect volumes.
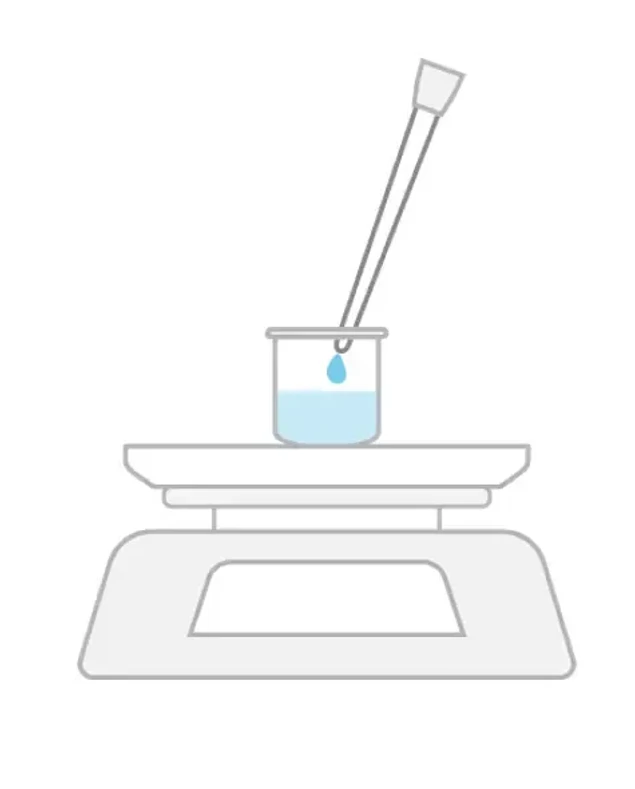 KNAUER: Density Matters – Recalibration Based on Liquid Density
Use the Right Tip
Even excellent pipetting technique cannot compensate for an unsuitable pipette tip. The best performance is achieved by using tips specifically designed for your pipette model. Manufacturer-recommended tips are generally the safest choice, although compatible third-party tips can also provide reliable results when properly matched.
Poorly fitting tips may lead to leakage, reduced precision, or inaccurate volume delivery. A high-quality tip should create a secure airtight seal without excessive mounting force, be manufactured from premium materials, and remain free of defects that could compromise sample transfer.
💡 Pro Tip: BlueOrchid pipette tips are specifically designed to fit BlueOrchid pipettes, ensuring maximum performance, accuracy, and reliability.
Environmental Factors to Think About
Temperature
Before starting any pipetting procedure, allow the pipette, pipette tips, and liquids to equilibrate to room temperature.
Avoid working near open windows, air-conditioning vents, or in direct sunlight, as sudden temperature changes can affect the air cushion inside the pipette. Variations in air volume directly influence dispensing accuracy and may reduce overall precision.
For optimal performance, pipetting should be carried out at temperatures between 20°C and 25°C.
Proper Pipette Handling
Whenever the pipette is not actively being used, place it in a pipette stand or holder.
Holding the pipette continuously for long periods transfers heat from your hand to the instrument. This warms the internal air cushion, causing it to expand and potentially affecting dispensing accuracy.
Likewise, never leave a pipette lying horizontally on the laboratory bench with liquid inside the tip. In this position, liquid can migrate into the pipette body and contaminate or damage its internal components.
Setting the Volume Correctly
When adjusting the pipette to a lower volume, simply rotate the adjustment mechanism directly to the desired setting.
When increasing the volume, first turn the adjustment wheel approximately one-third of a turn beyond the required volume, then slowly return to the desired setting.
This approach minimizes mechanical backlash and helps ensure greater accuracy in the selected volume.
Calibration and Cleaning
To ensure that your pipette continues to deliver accurate and precise volumes, it should be calibrated at least once per year. Routine calibration helps maintain performance within the manufacturer's specified tolerances and supports reliable analytical results.
The exterior of the pipette should also be cleaned regularly. Wipe the surfaces with a soft, non-abrasive cloth lightly moistened with isopropanol to remove residues and maintain good laboratory hygiene.
Change the Tip
Always use a new pipette tip when moving from one sample to another. The tip should also be replaced whenever changing reagents or whenever residual droplets remain inside after dispensing.
Regular tip replacement minimizes the risk of carry-over and cross-contamination, helping to preserve sample integrity and ensuring dependable analytical results.
💡 Pro Tip: Tired of loading individual tips into empty boxes? BlueOrchid reload units allow you to refill tip racks quickly and conveniently, saving both time and effort.
Ergonomics: Put Your Hands First
Maintaining a comfortable working posture during pipetting not only reduces operator fatigue but also lowers the risk of repetitive strain injuries. Better ergonomics contribute to improved accuracy, consistency, and overall laboratory performance.
BlueOrchid Pipettes are designed with user comfort in mind:
- Extremely low plunger operating force
- Magnet-assisted piston featuring an innovative spring and seal system
- Lightweight construction with balanced weight distribution
- Shock-absorbing mechanism for smooth and effortless tip ejection
These ergonomic features make extended pipetting sessions significantly more comfortable by reducing hand strain and operator fatigue, allowing users to work efficiently even during high-throughput workflows.
Discover everything BlueOrchid Pipettes have to offer.
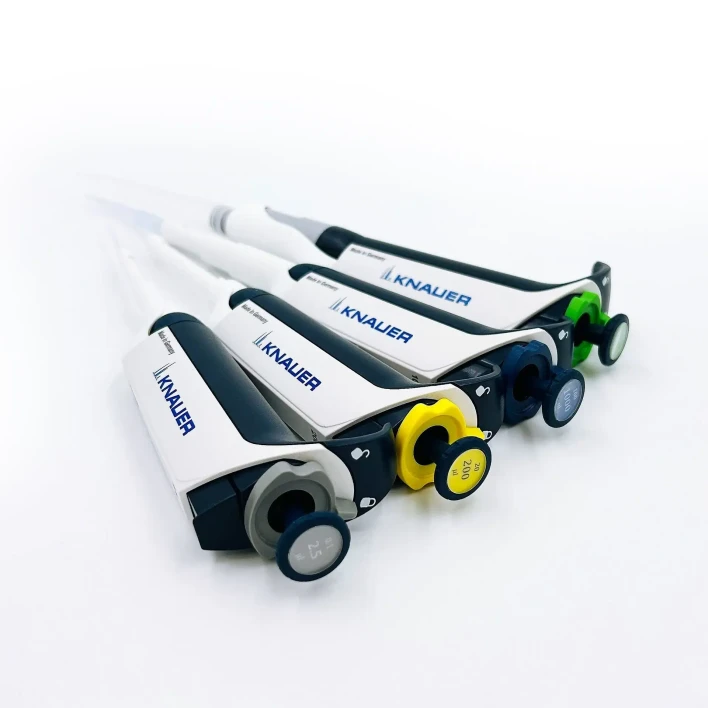 KNAUER: Figure 4 - BlueOrchid Pipettes
Final Thoughts
Developing excellent pipetting technique requires practice, careful attention to detail, and consistent application of proven best practices. By following the recommendations outlined in this guide, you can reduce pipetting errors, improve data quality, and increase the overall reliability and reproducibility of your experimental results.
Even small refinements in technique can have a significant impact on analytical performance. Taking a little extra time to pipette accurately and consistently today can help prevent costly errors and produce more dependable results in the future.
- BRAND GmbH & Co KG, Poster, 10 steps to becoming a pipetting pro (last accessed: 2025-10-31, 8:02).
- Mettler-Toledo LLC, Poster, Good Pipetting Practice, (last accessed: 2025-10-31, 7:56).
- Corning Inc., Poster, Good Pipetting Practice, (last accessed: 2025-10-31, 8:04).
- INTEGRA Biosciences Corp., Poster, Handheld Pipetting – Best Practices, (last accessed: 2025-10-31, 7:52).
- Eppendorf SE, Poster, Pipetting Techniques, (last accessed: 2025-10-31, 8:07).