Troubleshooting Waters Alliance 2695: Pump operation - No Flow
Tu, 5.3.2024
| Original article from: HPLC service/Ing. Jiří Luňák
- Foto: Jiří Luňák: Troubleshooting Waters Alliance 2695: Pump operation - No Flow
How to proceed if your HPLC pump does not deliver any flow? Here's how to solve this problem, plus tips and recommendations from Ing. Jiří Luňák (HPLC service).
You can download the presentation in pdf format: Troubleshooting Waters Alliance 2695: Pump operation - No Flow
No flow
- Set flow rate but no flow passed.
- Operating pressure close to zero.
- Usually at startup of HPLC system after its overnight or long term shutdown.
- Dry prime – direct function from Alliance menu – no solvent drawn into the syringe.
- Wet prime – no flow pass the system and the operating pressure is close to zero.
Offer of refurbished Waters modules by Jiří Luňák & LabRulez
- Waters Alliance 2695 HPLC system with UV-Vis detector (Refurbished)
- Waters 600E Multisolvent Delivery Pump (Refurbished)
- Waters 2487 UV-Vis HPLC Detector (Refurbished)
- Waters 515 HPLC Pump (Refurbished)
- Waters 2410 Refractive Index Detector (Refurbished)
- Waters 474 Scanning Fluorescence Detector (Refurbished)
Coming soon
- Waters Acquity HPLC System (Bazaar) (BP, TCC, ALS, PDA)
- Waters Acquity HPLC System (Bazaar) (BP, TCC, ALS, TUV)
- Waters Acquity LC/MS System (BP, TCC, ALS, SQ MSD) (Refurbished)
- Additional modules on request
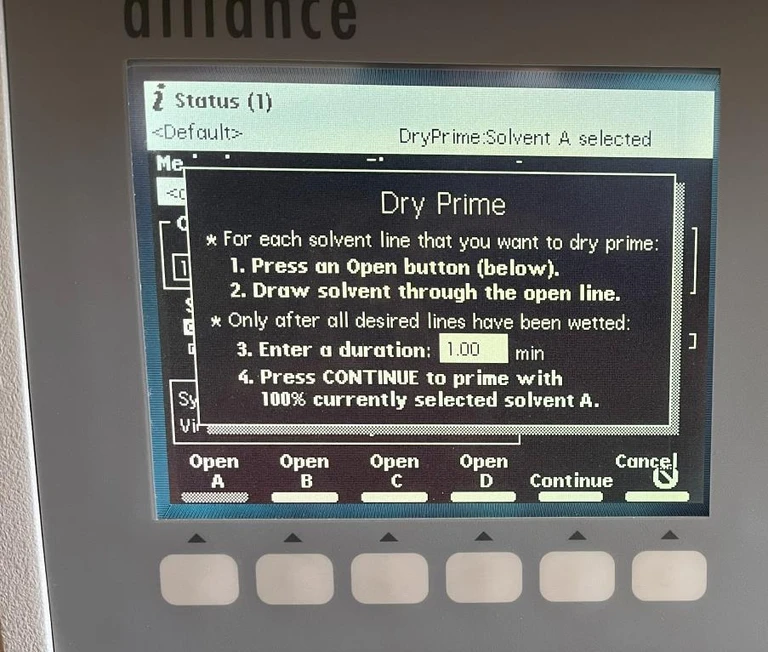
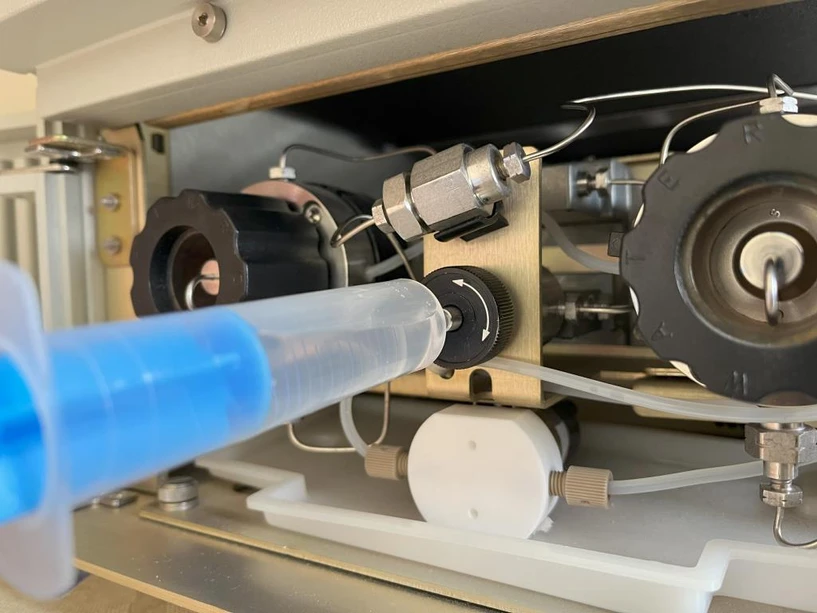
Dry prime – no solvent drawn
- Go to „Direct Functions“, select „Dry Prime“, open the solvent path A – D and check if the solvent can be drawn.
- If no solvent pass the pump the most common reason is blocked or sticky check valve.
- Press „Cancel“ to leave the Dry Prime function.
 Jiří Luňák: Dry prime – no solvent drawn
 Jiří Luňák: Dry prime – no solvent drawn
Closing the solvent paths for check valve removal
- The solvent bottles are usually located above the pump level and any disconnection will cause the solvent leak because of the gravity.
- Placing the solvent bottles below the level of the pump is a possible route, but handling the bottles is usually not convenient.
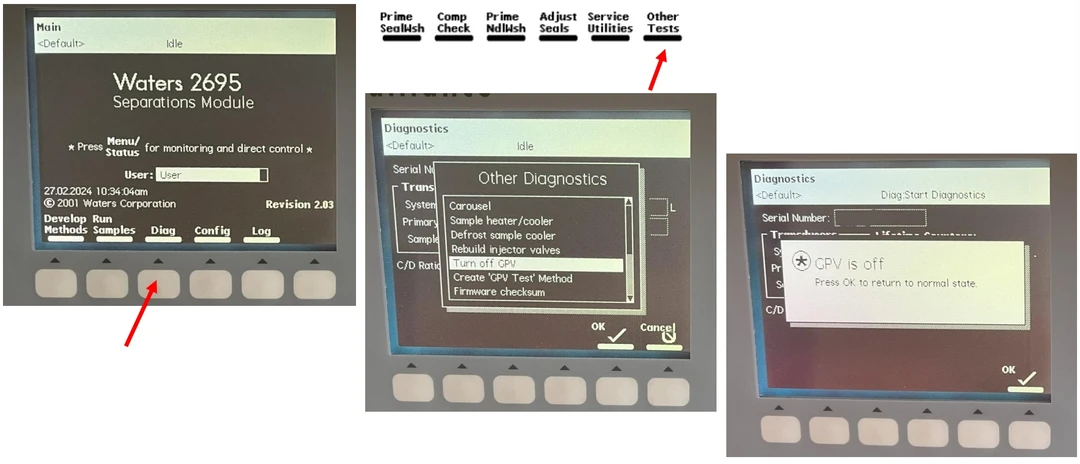
- There is no need to turn off the instrument to close the solvent inlet, use the function „Turn off GPV“.
- From the Alliance main window select the „Diag“ and choose in the „Other Tests“ the function „Turn off GPV“.
Closing the solvent paths for check valve removal
 Jiří Luňák:Closing the solvent paths for check valve removal
Check valve (CV) cartridge removal
- Start with the right side of the pump – the Primary pump head.
- Unscrew only the check valve holder using the 1/2“ open wrench.
- The inlet capillary disconnection is not needed.
-cartridge-removal_l.webp) Jiří Luňák: Check valve (CV) cartridge removal
Jiří Luňák: Check valve (CV) cartridge removal
Check valve cartridge cleaning and installation
- Remove the CV cartridge and sonicate it in the beaker with appropriate solvent (hot water, methanol, isopropanol).
- Reinstall CV cartridge into the housing, the arrow on the side of the check valve points up (direction of the flow).
- Tighten the housing back.
- Do not overtighten the housing screw, the CV cartridge has a PEEK seals and overtightening will deform it.
- Finish the „GPV off“ diagnostics (Press OK) to return to normal state.
- Try dry prime and wet prime procedures.
- Set the flow rate and check the operation pressure.
Check valve cartridge cleaning and installation
- Correct orientation of the CV according to the arrow on the side, in the direction of flow, i.e. upwards.
-Orientace-NAHORU_l.webp) Jiří Luňák: Check valve cartridge cleaning and installation direction Orientace upwards
Jiří Luňák: Check valve cartridge cleaning and installation direction Orientace upwards
- Applies to both Check Valves.
_l.webp) Jiří Luňák: Check valve cartridge cleaning and installation
Jiří Luňák: Check valve cartridge cleaning and installation
Any more suggestions and tips
- In most the cases, only the right (Primary) CV is blocked.
- Sometimes cleaning does not help and it needs to be replaced, or the same procedure (cleaning or replacing) should be carried out on the left (Accumulator).
- In normal condition, the GPV opens the selected path and gravity pushes the solvent which is located higher than the pump. Only a clogged solvent filter (placed in the solvent bottle) or a completely dry inlet tube would prevent the spontaneous flow of the solvent.
- Whether the solvent passes through the pump and where it is possibly blocked can easily be seen by loosening the CV housing by 1/2“ wrench.
- If after partially opening the CV housing at the left head (Accumulator) the solvent does not flow spontaneously around the thread (as a leak), then the path in front of it is blocked, focus on the right (Primary) head. If, on the other hand, solvent passes through, but cannot be drawn through Dry Prime, then the block is on the left (Accumulator) head.
 Jiří Luňák: Any more suggestions and tips
Jiří Luňák: Alliance pump – simplified fluidics path
-cover-photo_s.webp)
Jiří Luňák (HPLC service)